Welcome to my Rant & Review page, this is where I share my thoughts about anything and everything
Why is it whenever we have a snow storm the first vehicle I see in the ditch is an SUV (Stupid Useless Vehicle - or Sport Utility Vehicle you figure it out) Just because you have 4 wheel drive does not mean you can drive however the hell you want when there is snow. People have a false sense of security driving these gas guzzling monsters, they think: "I have 4 wheel drive, snow wont bother me" that is until they touch the brakes. people forget that cars have always had 4 wheel brakes. Ice + brakes = sliding. I drive a '95 geo metro, it's a piece of crap, but I have never gone into the ditch with it because I have decent snow tires, and I SLOW DOWN when there is snow on the road. No wonder the Insurance rates are so high, people buy a $50,000 SUV then proceed to drive like madmen in the snow and put it in the ditch.
Dangerboy
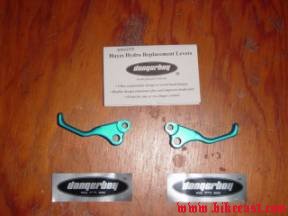
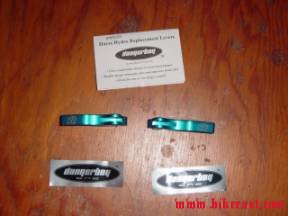
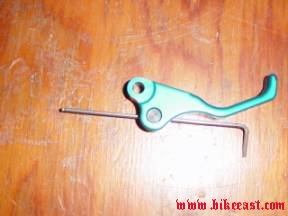
1 finger Hayes replacement Levers:
|
What you get in the package: 2 custom cnc machined 1 finger levers 2 Dangerboy CNC pimp silver metallic stickers. |
|
|||
|
|
|
|||
|
One of the things I noticed right away is the logo on the inside of the lever, the logos are engraved so that they are right side up when you install the levers, that means the logos are done differently for right and left levers. Attention to detail like this shows Dangerboy CNC’s commitment to quality. |
|
|||
|
How to Install |
||||
|
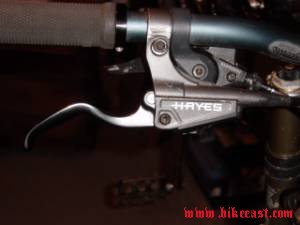
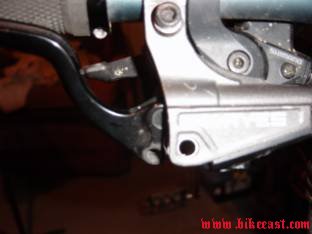
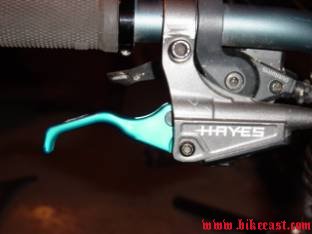
Before: Hayes Hfx 9 HD stock levers: |
|
|||
|
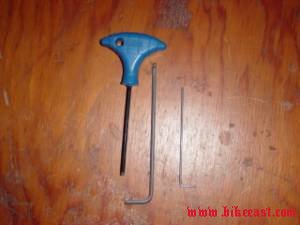
Tools required for the switch: 2 - 4mm allen keys, 1 - 2 mm allen key, a decent place to work on your bike. It helps if the 2mm allen key has a ball end to make it easier to get into tight spaces. |
|
|||
|
|
|
|||
|
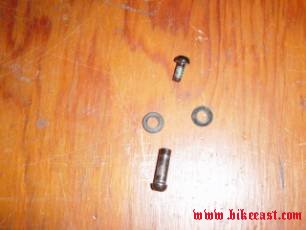
Step 1: Remove the lever pivot bolt from the master cylinder body using the 2 – 4mm allen keys. Make sure you do not lose the 2 shim washers , one on top of the lever and one below, when you take out the pivot bolt. Here is the pivot bolt, and the 2 washers: |
|
|||
|
|
|
|||
|
The lever should now look like this: |
|
|||
|
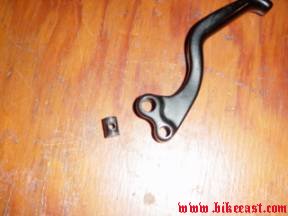
Step 2: Insert the 2mm allen key into the reach adjuster bolt and turn until the lever comes off the adjuster. Step 3: Remove the reach adjust nut from the lever: |
|
|||
|
|
|
|||
|
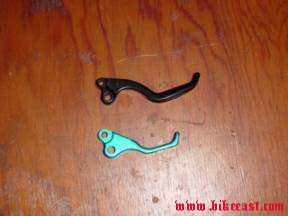
Here is the old lever compared to the new lever: |
|
|||
|
|
|
|||
|
Step 4: Put the reach adjust nut into the new lever, and put the 2mm allen key through the hole in the nut like this: |
|
|||
|
Step 5: Put the end of the allen key into the reach adjuster bolt and start threading the 2 together. This makes it much easier to start the threads of the adjuster bolt, make sure not to cross thread the adjuster bolt, they aren’t very big and are easy to strip. Only thread the adjuster bolt in till it just starts coming out of the adjuster nut. Step 6: Put the shim washers back in place and reinstall the pivot bolt in the master cylinder body. Do not overtighten this bolt, if it is too tight the lever will not return to the original position after you let it go effectively locking on your brakes. The finished product should look like this: |
|
|||
Initial impressions:
Pros:
-Well made, no sharp corners like on a lot of cnc parts.
-Attention to detail, the logo on the levers is right side up for left and right levers.
-Feel stiffer than the stock levers, cheaper than replacing stock levers.
-Have traction grooves machined into the blade of the lever better grip than stock
-Lots
of colour choices, why did I pick blue you ask?
Just to make you ask a silly question that’s why!
Cons:
-Reach adjuster bolt is hard to get at if you like to run the levers close to the bar
-Really
short – I had to move the levers closer to the grips to be comfortable.
I have a custom cut sram front
twist shifter and I almost can’t reach the lever,
I think I will be switching to a rapidfire shifter for the front.
If you use gripshift for front and
rear these may not be for you.
-No instructions in the package, but it is recommended that you have a qualified bike mechanic install them.